移动端的列表页加载,一般是下拉加载更多,当翻页较多时,页面渲染节点太多,就会造成页面卡顿。需要对长列表进行优化,达到无限下拉。在微信小程序的扩展组件有一个recycle-view实现的长列表,支付宝没有长列表组件,需要我们自己开发。
实现原理
长列表渲染节点过多造成卡顿。
实际上我们只需要渲染可视区域即可,对视口以外的部分,可以用padding或者一个指定高度的view来合并代替。监听页面滚动,修改渲染部分。这样不管我们怎么滚动,页面中渲染的节点数量是固定的。实际上考虑到用户感受,前后页面也进行渲染。
此时的问题就是计算了。列表还是那个列表,我们要根据scrollTop计算从哪个到哪个元素显示,计算顶部和底部高度。另外,列表的元素高度可能不固定,要传入函数动态计算。
组件设计
模板我们设计成这样,通过具名slot传入元素。外部传入list用于计算,同时通过recycle-item-{{index}}的slot来传入列表元素渲染。通过控制渲染的index,来控制渲染部分,同时通过pt和pb的值控制上下空间。
微信的recycle-view还有一个recycle-item组件,这就造成了一个问题,为了在渲染时保持recycle-view和recycle-item的同步,又造了一个公用的对象来实现手动触发渲染。这里我们就在一个组件渲染,不用单独处理。
另外设计一个header和footer的slot,用于在渲染项前后紧接一些东西。
1
2
3
4
5
6
7
8
9
10
11
| <scroll-view scroll-y class="{{className}}" style="{{style}}" trap-scroll upper-threshold="{{upperThreshold}}" lower-threshold="{{lowerThreshold}}" onScroll="onScroll" onScrollToUpper="onScrollToUpper" onScrollToLower="onScrollToLower" catchTouchMove="{{stopPropagation}}">
<view style="width: 100%; height: {{pt}}px;"></view>
<slot name="recycle-header"></slot>
<block a:for="{{list}}" a:key="{{index}}">
<view class="recycle-item-wrapper" a:if="{{index >= startIndex && index <= endIndex}}">
<slot name="recycle-item-{{index}}"></slot>
</view>
</block>
<slot name="recycle-footer"></slot>
<view style="width: 100%; height: {{pb}}px;"></view>
</scroll-view>
|
页面初始化时,startIndex和endIndex就是list的第一个和最后一个。
监听onScroll事件,对list遍历,计算每个元素的高度,计算起始位置并渲染。
1
2
3
4
5
6
7
8
9
10
11
12
13
14
15
16
17
18
19
20
21
22
23
24
25
26
27
28
29
30
31
32
33
34
35
36
37
38
39
40
41
42
43
44
45
46
47
48
49
50
51
52
53
54
55
56
57
58
59
60
61
62
63
64
65
66
67
68
69
70
71
72
73
74
75
76
77
78
79
80
81
82
83
84
85
86
87
88
89
90
91
92
93
| import {
rpx2px,
} from '../../utils/util'
const app = getApp()
const THROTTLE_TIME = 500
const BEFORE_PAGE = 3
const AFTER_PAGE = 3
Component({
data: {
pt: 0,
pb: 0,
},
props: {
list: [],
height: 0,
onItemHeight: 0,
className: '',
style: '',
upperThreshold: 100,
lowerThreshold: 100,
onScroll: null,
onScrollToUpper: null,
onScrollToLower: null,
stopPropagation: true,
},
didMount () {
this.init()
},
didUpdate (prevProps) {
if (this.props.list !== prevProps.list || this.props.list.length !== prevProps.list.length) {
if (!prevProps.list || prevProps.list.length === 0) {
this.init()
}
}
},
didUnmount () {
if (this.timer) {
clearTimeout(this.timer)
this.timer = null
}
},
methods: {
init () {
const { systemInfo } = app.globalData
const screenHeight = systemInfo.screenHeight
const list = this.props.list
this.scrollTop = 0
this.lastScrollTop = 0
this.timer = null
this.screenHeight = screenHeight
let totalHeight = 0
for (let i = 0; i < list.length; i++) {
totalHeight += this.getItemHeight(list[i], i)
}
this.totalHeight = totalHeight
this.setData({
pt: 0,
pb: 0,
startIndex: 0,
endIndex: list.length - 1
})
},
render (e) {
},
getItemHeight (item, index) {
const h = this.props.onItemHeight
switch (typeof h) {
case 'number':
case 'string':
return rpx2px(h)
case 'function':
return rpx2px(h(item, index))
}
},
onScroll (e) {
this.render(e)
this.props.onScroll && this.props.onScroll(e)
},
onScrollToUpper () {
this.props.onScrollToUpper && this.props.onScrollToUpper()
},
onScrollToLower () {
this.props.onScrollToLower && this.props.onScrollToLower()
},
},
})
|
渲染计算
从头开始计算组件高度,跟scrollTop以及屏幕高度对比,将scrollTop的位置当做当前屏幕顶部,scrollTop + screenHeight当做屏幕底部。然后一项项比对高度即可。
scroll设置节流。为了滚动时减少白屏,可以向前和向后多渲染几个屏幕高度。
1
2
3
4
5
6
7
8
9
10
11
12
13
14
15
16
17
18
19
20
21
22
23
24
25
26
27
28
29
30
31
32
33
34
35
36
37
38
39
40
41
42
43
44
45
46
47
48
49
50
51
52
53
54
55
56
| render (e) {
if (this.timer) {
clearTimeout(this.timer)
this.timer = null
}
setTimeout(() => {
const lastScrollTop = this.scrollTop
const scrollTop = e.detail.scrollTop
if (Math.abs(scrollTop - lastScrollTop) < 50) return false
const screenHeight = this.screenHeight
const list = this.props.list
let top
let bottom
let startIndex
let endIndex
let totalHeight
top = 0
bottom = 0
totalHeight = 0
for (let i = 0; i < list.length; i++) {
const ih = this.getItemHeight(list[i], i)
if (startIndex == null) {
if (totalHeight < scrollTop - BEFORE_PAGE * screenHeight) {
top += ih
totalHeight += ih
} else {
startIndex = i
totalHeight += ih
}
} else if (endIndex == null) {
if (totalHeight < scrollTop + screenHeight + screenHeight * AFTER_PAGE) {
totalHeight += ih
} else {
endIndex = i - 1
bottom += ih
}
} else {
bottom += ih
}
}
if (endIndex == null) {
endIndex = list.length - 1
}
this.scrollTop = scrollTop
this.totalHeight = totalHeight
this.setData({
pt: top,
pb: bottom,
startIndex,
endIndex,
})
}, THROTTLE_TIME)
},
|
效果
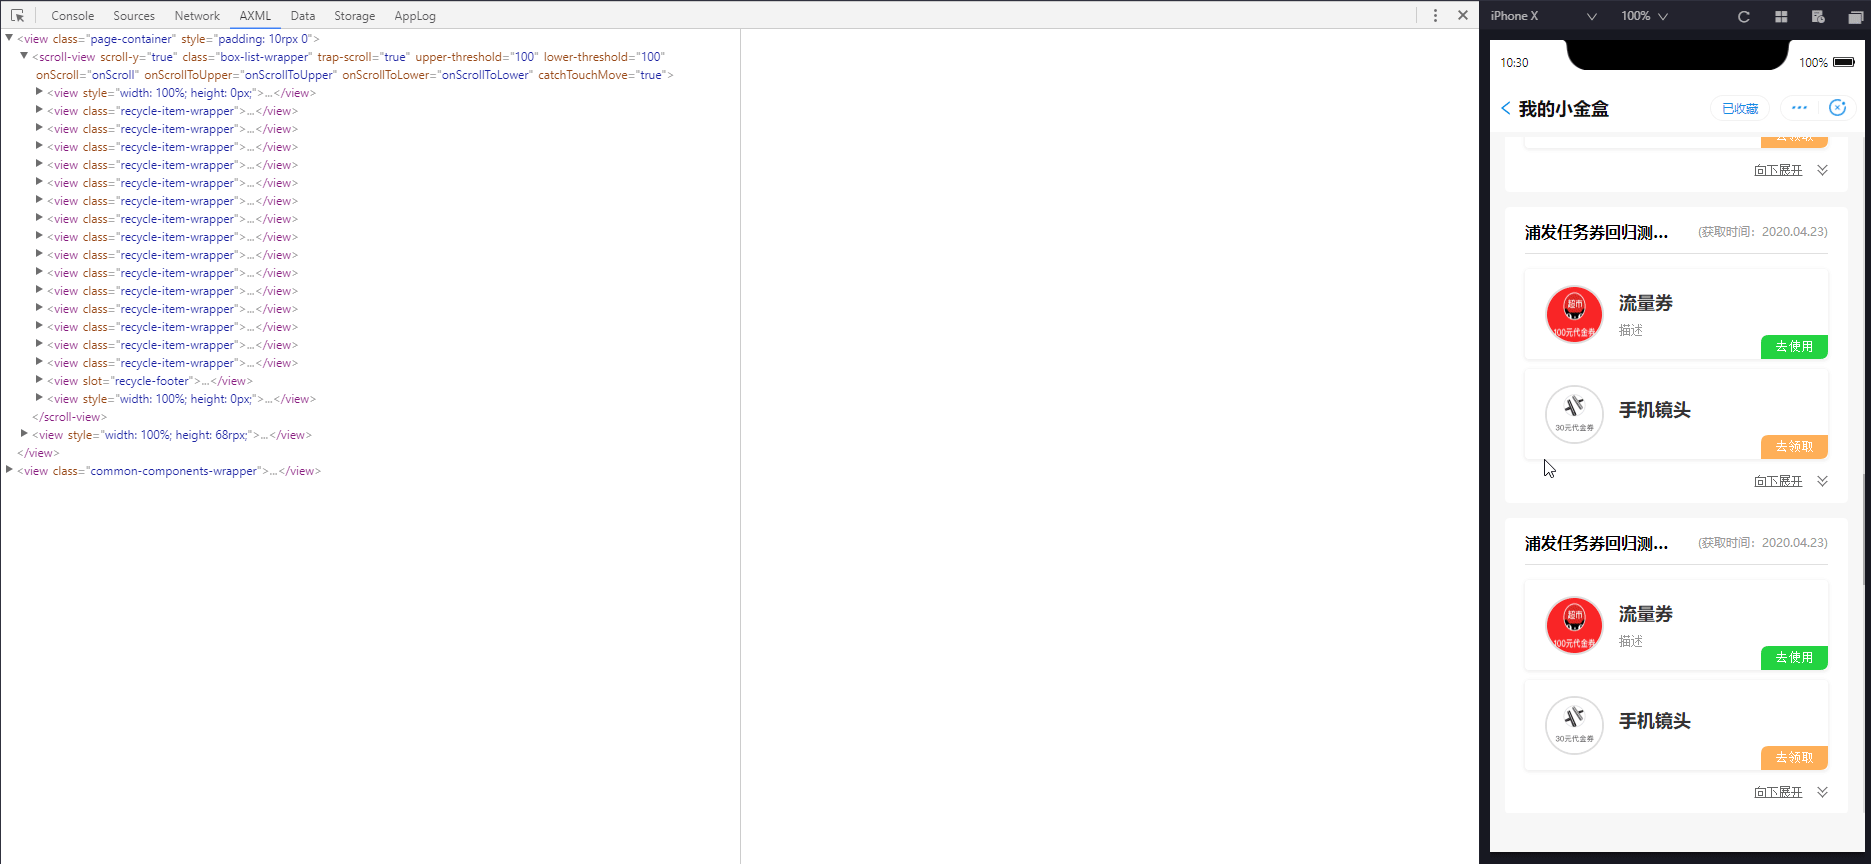
可以看到,下拉或上拉时,页面渲染的元素数量超过一定数量就不再增加,而是在上方和下方改变一个view的高度。
问题优化
- 快速滑动时会出现白屏现象
因为渲染元素有限,快速滑动时,滑动速度超过计算和渲染速度,导致看到上方和下方白色的view。暂时没有什么好的办法,只能增加向前和向后渲染的屏幕数量。
- 优化计算
上拉或下拉时,重新计算了整个数组。其实可以缓存上次计算的结果,判断是向上还是向下滑动,去向前或向后继续计算。但是触发计算时,不一定移动了整数个元素高度,这样计算可能会造成累加误差。后续考虑从这个思路继续优化。
- 顶部和底部元素渲染
其实一般列表的顶部和底部是用于下拉的图标和加载中的图标。这些内容应该是在scroll-view外部的,这样进入页面的时候,定位到元素的第一个,而不是header部分。这个可以通过套一层scroll-view来实现,当内部滚动到边界,继续滚动触发外部scroll-view。然后外部scroll-view在touchend时再回弹。
这里我的下拉刷新是页面刷新,上拉加载显示的是骨架屏,所以放在scroll-view内部即可。骨架屏放到footer里。
- 元素高度不确定
这里其实元素是可以展开的,展开时高度未知。这里我就忽略了展开的情况。不过因为向前向后多渲染了几屏,而展开项最多一个也不会太长,就直接忽略了。
实际上这里是可以拿到展开项的索引,然后获取页面节点高度,异步更新计算值。