github: https://github.com/ahao430/sdk-demo
npm仓库:https://www.npmjs.com/package/@ahao430/sdk-demo
1. 需求 开发一个sdk,将业务接口都放进去,活动项目和小程序通过npm安装,实现快速调用。
2. 分析
sdk是纯js,一般采用rollup打包,体积更小。
要同时适配h5和小程序,公用部分提出来,剩下不同的部分分开写。
通过sdk.模块名.接口名方式来调用
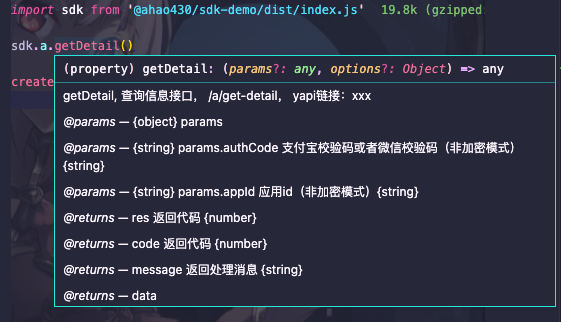
导出ts注释,通过npm引入,可以在vscode看到代码提示
3. 开发 3.1 目录结构 初始化项目,src目录存放源码,里面index.js作为入口,根目录新建rollup.config.js文件。
然后考虑到我们的sdk主要目的是存放api接口。在src新建一个modules目录,里面存放各个接口模块,再在每个模块目录编写一个个接口文件。
再考虑我们的项目要同时兼顾h5段和小程序端,应该有两个入口文件,分别打包各自的sdk。两个环境各发起请求的方式不同,需要分开写兼容代码,新建一个platform目录,新建h5和zfb分别存放各自平台的适配代码。在rollup中也需要有两个入口文件。
暂时设计目录结构如下:
1
2
3
4
5
6
7
8
9
10
11
12
13
14
15
16
. ├── dist ├── src │ ├── core // 核心代码 │ ├── modules // 模块 │ │ ├── a // 单个模块,里面写接口 │ │ ├── b │ │ └── index.js │ ├── platform // 平台 │ │ ├── h5 // h5 │ │ └── zfb // 支付宝小程序 │ ├── index.ts // h5入口 │ └── index.zfb.ts // 支付宝小程序入口 ├── package.json ├── README.md └── rollup.config.js // rollup配置
3.2 rollup配置 下面直接贴出最终配置,根据npm script的环境变量,取不同的入口文件。其中run dev时,把dist生成的打包文件又复制到demo/public目录下,同时在demo/index.html启动服务方便开发调试。
1
2
3
4
5
6
7
8
9
10
11
12
13
14
15
16
17
18
19
20
21
22
23
24
25
26
27
28
29
30
31
32
33
34
35
36
37
38
39
40
41
42
43
44
45
46
47
48
49
50
51
52
53
54
55
56
57
58
59
60
61
62
63
64
65
66
67
68
69
70
71
72
73
74
75
76
77
78
79
80
81
82
83
84
85
86
87
88
89
90
91
92
93
94
95
96
97
98
99
100
101
102
103
104
105
106
107
108
109
110
111
112
113
114
115
116
117
118
119
120
import json from 'rollup-plugin-json' import typescript from 'rollup-plugin-typescript2' import sourceMaps from 'rollup-plugin-sourcemaps' import commonjs from '@rollup/plugin-commonjs' import nodeResolve from '@rollup/plugin-node-resolve' import builtins from 'rollup-plugin-node-builtins' import babel from 'rollup-plugin-babel' import livereload from 'rollup-plugin-livereload' import { terser } from 'rollup-plugin-terser' import { eslint } from 'rollup-plugin-eslint' import replace from '@rollup/plugin-replace' import copy from 'rollup-plugin-copy' import dts from 'rollup-plugin-dts' import { defineConfig } from 'rollup' const libraryName = 'sdk' const production = process.env .NODE_ENV === 'production' const runEnv = process.env .RUN_ENV const release = process.env .RELEASE function serve ( let server function toExit ( if (server) server.kill (0 ) } return { writeBundle () { if (server) return server = require ('child_process' ).spawn ('npm' , ['run' , 'start' , '--' , '--dev' ], { stdio : ['ignore' , 'inherit' , 'inherit' ], shell : true }) process.on ('SIGTERM' , toExit) process.on ('exit' , toExit) } } } const entry = runEnv === 'h5' ? 'src/index.ts' : 'src/index.zfb.ts' const outputDir = production ? 'dist' : 'demo/public' const outPutName = runEnv === 'h5' ? 'index' : 'zfb' export default defineConfig ([{ input : entry, output : [ { format : 'es' , file : `${outputDir} /${outPutName} .js` }, { format : 'umd' , file : `${outputDir} /${outPutName} .umd.js` , name : libraryName, sourcemap : true } ], plugins : [ nodeResolve ({ browser : true , preferBuiltins : true , mainFields : ['browser' ] }), builtins (), eslint ({ fix : true , throwOnError : true }), commonjs (), replace ({ preventAssignment : true , 'process.browser' : true , 'process.env.NODE_ENV' : JSON .stringify (process.env .NODE_ENV ), 'process.env.RUN_ENV' : JSON .stringify (process.env .RUN_ENV ) }), typescript ({ exclude : 'node_modules/**' , typescript : require ('typescript' ), useTsconfigDeclarationDir : true }), json (), babel ({ exclude : 'node_modules/**' , runtimeHelpers : true }), sourceMaps (), !production && serve (), !production && livereload ('demo' ), production && terser (), release && copy ({ targets : [ { src : 'dist/*' , dest : 'releases' } ] }) ], watch : { clearScreen : false } }, { input : entry, plugins : [dts ()], output : { format : 'esm' , file : `${outputDir} /${outPutName} .d.ts` } } ])
核心代码编写 我们希望入口文件拿到sdk,然后可以调用sdk.模块.接口。同时,sdk上挂载一些属性和方法。这里sdk用一个class来处理会比较好,然后在入口文件new这个class的时候,可以将platform作为参数传入。
另外,编写模块的时候,这个请求的方法显然要从platform获取,但是我们挂在实例上,可以通过this获取。
先来编写模块:
1 2 3 4 5 6 7 8 9 10 11 12 13 14 export default function getList (params: any = {}, options: Object = {} ) { return this .get ('/a/get-list' , params, options) }
1
2
3
4
5
6
7
8
import getList from './getList' import getDetail from './getDetail' export default { getList, getDetail, }
1
2
3
4
5
6
7
8
9
10
11
12
import a from './a/index' import b from './b/index' const modules = { a, b, } export default modulesexport type TModules = typeof modules
如上,我们可以通过modules.a.getList拿到方法,后面要考虑一下this指向问题。
1
2
3
4
5
6
7
8
import './utils/polyfill' import SDK from './core/sdk' import h5 from './platform/h5' const sdk = new SDK (h5)export default sdk
1
2
3
4
5
6
7
8
9
10
11
12
13
14
15
16
17
18
19
20
21
22
23
24
25
26
27
28
29
30
import modules from '../modules/index' import store, { setStore } from './store' class SDK { private _engine : any public _modules : any public store : any public request : Function public get : Function public post : Function public setStore : Function constructor (engine: any ) { this ._engine = engine this .store = store this .store .platform = engine.platform this .request = engine.request this .get = engine.request .get this .post = engine.request .post this ._modules = modules this .setStore = setStore } } export type TSdk = typeof SDK export default SDK
这里,我们可以通过sdk._modules.a.getList调用。下面来编写传入的参数部分。其中store是一个公用的存储对象。
1
2
3
4
5
6
7
8
9
const store = { uid : '' , appId : '' , config : null , env : 'prod' , debug : false , } export default store
适配代码编写 暂时需要做的适配就是请求。在h5发送ajax请求,我们选用axios;在支付宝小程序,使用my.request。这里,我们要对两边做一些处理,保证使用的格式一样。
axios的文档,使用格式是这样:axios.get(url, option), axios.post(url, body, option)。其中option包含headers, params等等。所以get请求和post请求的一般格式是:axios.get(url, {params: data}), axios.post(url, data)。
而my.request(option),接收一个参数对象,其中的data字段在get请求时是query参数,在post请求时是body参数;post请求如果还想带query参数,就只能在url上拼了。也没有baseURL属性,域名要拼在url上。并且不支持promise。下面对二者做一些封装。
1
2
3
4
5
6
7
import request from './request' export default { platform : 'h5' , request }
1
2
3
4
5
6
7
8
9
10
11
12
13
14
15
16
17
18
19
20
21
import axios from 'axios' const instance = axios.create ({ timeout : 10000 }) const get = (url, data, options = {} ) => instance.get (url, { ...options, method : 'GET' , params : data }) const post = (url, data, options = {} ) => instance.post (url, data, { ...options, method : 'POST' , }) export default { get, post }
1 2 3 4 5 6 7 8 9 10 11 12 13 14 15 16 17 18 19 20 21 22 23 24 25 26 27 28 29 30 31 32 33 34 35 36 37 38 39 40 41 42 43 44 45 46 47 48 49 50 const ajax = async (url, data, options ) => const response = await new Promise ((resolve, reject ) => { let formatUrl = config.baseURL + url if (config.method === 'GET' ) { my.request ({ ...config, data : config.params , url : formatUrl, success : resolve, fail : reject }) } else { if (config.params ) { const arr = [] for (const key in config.params ) { arr.push (key + '=' + config.params [key]) } if (arr.length ) { formatUrl += '?' + arr.join ('&' ) } } my.request ({ ...config, data : config.data , url : formatUrl, success : resolve, fail : reject }) } }) return response } const get = (url, data, options ) => ajax (url, {}, { ...options, params : data, method : 'GET' }) const post = (url, data, options ) => ajax (url, data, { ...options, method : 'POST' }) export default { get, post }
通过以上的封装,我们调用方法统一入参格式get(url, data, option), post(url, data, option)。其中get第二个参数是query参数,post第二个参数是body参数,最后都返回一个promise。
除此之外,我们在不同的环境,要对参数做不同的处理。在小程序环境,每个请求要带上authcode,可以通过my.getAuthCode获取。这里我们在两个request文件分别封装拦截器功能,在小程序的request加上authcode逻辑,再在公用代码编写其他通用的拦截器业务逻辑。
现在可以在sdk调用方法,但是调用的链比我们期望的多写一步,再就是this的问题需要解决。
proxy处理 上面的两个问题,都可以通过proxy解决。
当get访问sdk.xxx时,如果key是modules的key,直接代理到sdk._modules[key],去掉了._modules看起来就舒服多了。对module继续代理,对module的api接口,正常返回,其他的属性返回sdk的属性。这样get,post请求就代理到了sdk上。同时,对sdk本身的set,return false,防止修改sdk本身。至于modules,加个Object.freeze。而sdk.store本身不能修改,其内部的属性是可以修改的。
1
2
3
4
5
6
7
8
9
import './utils/polyfill' import SDK from './core/sdk' import getProxy from './core/proxy' import h5 from './platform/h5' const sdk = new SDK (h5)export default getProxy (sdk)
1
2
3
4
5
6
7
8
9
10
11
12
13
14
15
16
17
18
19
20
21
22
23
24
25
26
27
28
29
30
31
32
33
34
35
36
37
38
39
40
41
42
43
44
45
46
47
48
49
import TSdk from './sdk' import TModules from '../modules' type TProxy = typeof TModules & TSdk const getProxy = (sdk: any ) => { const proxy : TProxy = new Proxy ((sdk), { get (target, prop, receiver) { const modules = sdk._modules if (typeof prop === 'string' && prop.indexOf ('_' ) === 0 ) { return undefined } else { for (const key in modules) { if (prop === key) { const module = modules[prop] const moduleProxy = new Proxy (module , { get (target, prop, receiver) { if (typeof target[prop] === 'function' ) { return target[prop] } else { return sdk[prop] } }, set (target, prop, value) { return false } }) return moduleProxy } } } return target[prop] }, set (target, prop, value) { return false } }) return proxy } export default getProxy
4. 发布和使用 现在我们可以发布和使用了。先注册账号,然后执行npm login登录,再执行npm publish发布到npm。就可以在其他项目安装依赖并使用了。
要注意的是:
nrm use npm,切换回npm源
先commit所有改动
package.name用@用户名/项目名格式的,后面要加参数npm publish –access public
先登录再发布
然后我们新建一个项目,像其他npm包一样安装和调用。
1 2 3 4 5 6 import sdk from '@ahao430/sdk-demo/dist/index.js' console .log (sdk)sdk.a .getList (params, options)
5. ts导出提示 现在已经可以正常使用sdk.模块.接口来发起请求了。但是通过proxy之后,我们导出的ts上实际是没有这个信息的。在vscode中,我们把鼠标放到方法上面,什么提示也看不到。而我们前面写方法的时候,是有写详细的注释的,我们的需求本身就是开发一个sdk供组内同事调用,代码提示肯定是越详细越好。
这里其实很简单,ts中有个typeof方法,可以获取对象的type。我们把modules的type导出,再挂到proxy上就可以了。
1
2
3
4
5
6
7
8
9
10
11
12
import TSdk from './sdk' import TModules from '../modules' type TProxy = typeof TModules & TSdk const getProxy = (sdk: any ) => { const proxy : TProxy = new Proxy ((sdk), { ...
再次发布,然后在项目中引用,就可以看到vscode提示信息了。
6 其他 在此基础上,又加了一些优化,比如加了一个debug属性,当设置sdk.debug = true,再次调用sdk方法,会在控制台打印很多日志来帮助。还有加入了环境变量,来适配接口的域名,以及通过域名在拦截器精细处理。
完整的代码可以参见上面github仓库,移除了公司业务代码,放了一个demo在这里。